This article is a part of the series "Use Kubernetes to host .NET 8 applications":
Containerize and Host .NET 8 applications in Kubernetes (this article)
Scaling .NET 8 Applications in Kubernetes
Hosting .NET 8 Applications in Azure Kubernetes Service (AKS)
Have you ever felt the struggle of managing the ever-growing complexity of your applications? As our projects become increasingly interconnected, deploying and orchestrating them becomes a serious task.
That's where Kubernetes steps in. Think of it as your ultimate helper in the world of container orchestration. It takes care of deploying, scaling, and managing your applications.
As a .NET developer, I want to dive into using Kubernetes with .NET 8 in this series of articles, but in reality, it can be used with everything.
Test application
Let's get started with our test application (the source code). I want to make it simple but at the same time, it should be a good starting point to learn how to work with Kubernetes. For that purpose, I have created a console application that represents a simple background process. The source code of it below.
Console.WriteLine("Hello, Kube!");
Console.WriteLine("Starting background process");
Console.WriteLine("Looking for a configuration in local file");

var stepToRun = 0;

const string configFileName = "step.config";

if(File.Exists(configFileName))
{
    stepToRun = int.Parse(File.ReadAllText(configFileName));
    Console.WriteLine($"{stepToRun} steps were completed. Continue process.");
    stepToRun++;
}
else
{
    Console.WriteLine("Configuration does not exists. Starting from 0 step");
}

while(true)
{
    Console.WriteLine($"Processing step: {stepToRun}");

    // Do some work
    Thread.Sleep(5000);
    File.WriteAllText(configFileName, stepToRun.ToString());

    stepToRun++;
}
In a nutshell, this background process simulates processing and saves the progress in the local configuration file. If you run it for the first time, it starts processing from step 0.
Hello, Kube!
Starting background process
Looking for a configuration in local file
Configuration does not exists. Starting from 0 step
Processing step: 0
Processing step: 1
Processing step: 2
Processing step: 3
Rerunning the application will give a slightly different result.
Hello, Kube!
Starting background process
Looking for a configuration in local file
4 steps were completed. Continue process.
Processing step: 5
Processing step: 6
Processing step: 7
I know this is a somewhat silly application, but it will help us learn some important concepts in the future.
Containerization of test application
We need to create a container image for our application. Docker is the de facto standard for working with containers, so I will use it for this purpose.
Please find below the content of the Dockerfile for the sample application.
FROM mcr.microsoft.com/dotnet/runtime:8.0 AS base
WORKDIR /app

FROM mcr.microsoft.com/dotnet/sdk:8.0 AS build
WORKDIR /src
COPY *.csproj ./
RUN dotnet restore
COPY . .

FROM build AS publish
RUN dotnet publish -c Release -o /app/publish

FROM base AS final
WORKDIR /app
COPY --from=publish /app/publish .
ENTRYPOINT ["dotnet", "HelloKube.dll"]
This Dockerfile builds a multi-stage Docker image for a .NET 8 application, optimizing for a smaller final image size by separating the build and runtime dependencies.
It starts with the official runtime image for .NET 8.0 mcr.microsoft.com/dotnet/runtime:8.0.
We use the SDK image mcr.microsoft.com/dotnet/sdk:8.0 to restore Nuget packages and build and publish the application in the release configuration.
In the final stage, we only need to copy the published files of the application from the previous stage and set the entry point.
To build the image from our Dockerfile we need to use the following command.
docker build -t hello-kube:1.0 .
After completing the Docker build command, you should have the image hello-kube on your machine. It's time to move on to the Kubernetes part.
Kubernetes in a few words
Before installing Kubernetes let's stop for a minute and talk about how it works with containers.
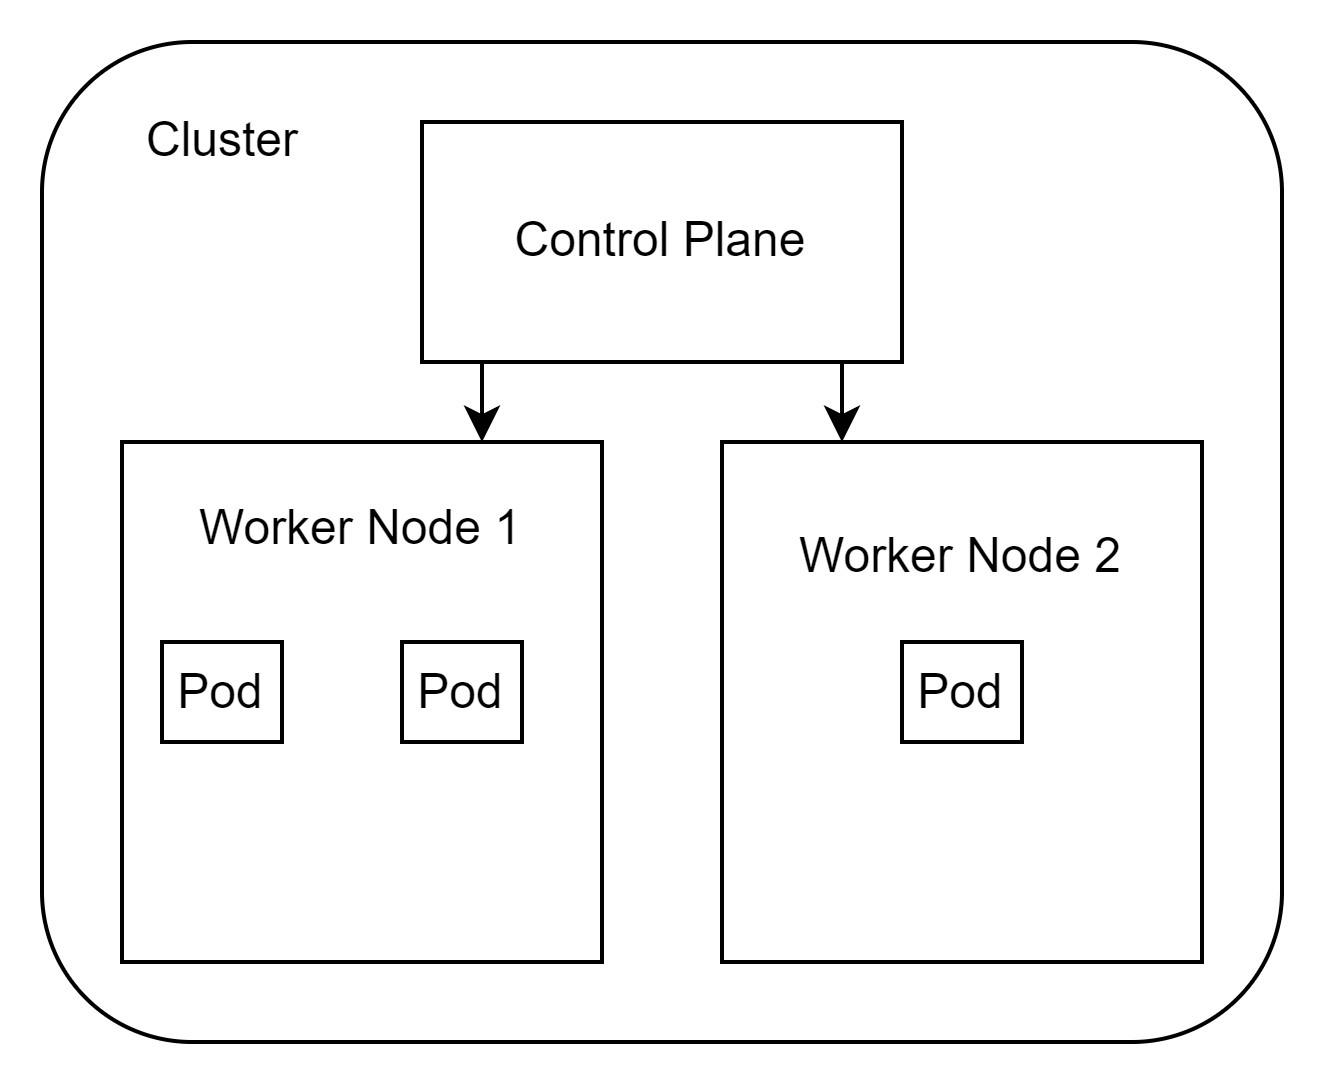
Kubernetes contains many different components, each with its own responsibility. For running our background process, we need to use the following:
Pod
Nodes (Worker and Control Plane)
Cluster
In reality, there are many more of them, but this article does not intend to replace the official documentation or grow to the size of a book. Thus, I will briefly cover only the most important parts necessary for understanding the content of the article.
A Pod is a place where your container or containers are running. You can think of it as an abstraction that helps Kubernetes to work with different types of applications. A Pod can run not only containers, but also virtual machines, WASM applications, and serverless functions. So, using such an abstraction allows Kubernetes not to care about the type of application it runs because it does not matter.
A worker node is a place where pods are run. It has a special runtime for that purpose. Besides that, the worker node load balances tasks and monitors pod status.
The Control Plane (in some resources you can see the name Master node as well) is a set of different services that rule worker nodes, and manage scaling, and deployment.
A cluster is a collection of nodes (machines) that work together to run containerized applications. It needs at least one control plane node for proper functioning.

This simple diagram shows how these components are tied together. As you can see, our cluster has 3 nodes: the control plane, worker node 1, and worker node 2. At the same time, worker nodes have running pods.
Create a cluster in the local environment
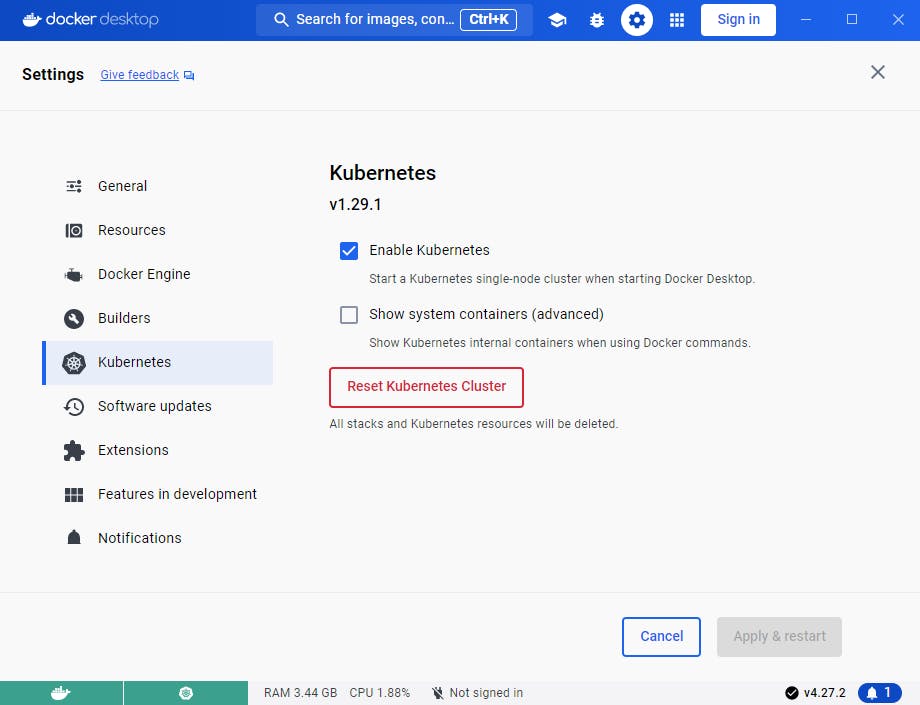
In this article, I'm going to use locally installed Kubernetes. Since I don't want to deal with a complex installation process, I will use Docker Desktop which is already installed on my machine.
Download and install the latest version of Docker Desktop (if you don't have it).
After installing Docker Desktop, open it.
Navigate to "Settings" by clicking on the Docker icon in the system tray (taskbar on Windows, menu bar on macOS).
Go to the "Kubernetes" tab and check the box next to "Enable Kubernetes."

Click the "Apply & Restart" button to save the changes and restart the Docker Desktop.
After Docker Desktop is restarted, open a terminal or a command prompt and enter the following command to check if Kubernetes is running.
kubectl version
You should have a response similar to this
Client Version: v1.29.1
Kustomize Version: v5.0.4-0.20230601165947-6ce0bf390ce3
Server Version: v1.28.2
By default, Docker Desktop creates a single node cluster with the name docker-desktop. It should be enough for our local development. Run the following command to verify that your cluster is running.
kubectl get nodes
NAME             STATUS   ROLES           AGE   VERSION
docker-desktop   Ready    control-plane   28d   v1.28.2
As you can see, I have a control-plane node with the name docker-desktop and it has the ready status, which means that we can start to work with our local cluster.
Running application container in Kubernetes
As we already know, we need the pod to run our container. We can create it in different ways: through CLI or using YAML configuration files. It is beneficial to use the second approach due to its readability, and you can store such files in the repository with the application code.
Create a configuration file with the name app-pod.yml to create a pod. The content of the file is below.
apiVersion: v1
kind: Pod
metadata:
  name: app-pod
spec:
  containers:
  - name: hello-kube
    image: hello-kube:1.0
Let's go through it.
apiVersion is the version of the Kubernetes API we would like to use.
kind indicates the type of Kubernetes resource we would like to provision.
metadata.name sets the name for our pod.
spec.containers describes which container to use.
To run a pod, we need to execute the following command.
kubectl apply -f app-pod.yml
The message pod/app-pod created should appear if the operation is successful.
Before going further, let's check which status our nodes have.
kubectl get pods
You can see the pod with the name app-pod in the list.
NAME      READY   STATUS    RESTARTS         AGE
app-pod   1/1     Running   10 (2m35s ago)   8d
It is time to check if our background process works. To do so, run the following command.
kubectl logs app-pod
On my machine, I have the following response.
Hello, Kube!
Starting background process
Looking for a configuration in local file
Configuration does not exists. Starting from 0 step
Processing step: 0
Processing step: 1
Processing step: 2
Processing step: 3
Processing step: 4
Processing step: 5
If you have the same, then congratulations, you have run your .NET 8 application in Kubernetes!
Let's pretend that we need to fix some important bug in our application or add a new functionality. We change the codebase and move the new version of the application into production.
I changed the first line in our application to the following to simulate some changes.
Console.WriteLine("Hello, Kube! v.1.1");
We need to build a new version.
docker build -t hello-kube:1.1 .
Don't forget to change the version of the image in app-pod.yml file from hello-kube:1.0 to hello-kube:1.1.
We need to redeploy our pod.
kubectl apply -f app-pod.yml
Checking the logs, we see.
Hello, Kube! v.1.1
Starting background process
Looking for a configuration in local file
Configuration does not exists. Starting from 0 step
Processing step: 0
Processing step: 1
Processing step: 2
The new version of our application runs (you can see it in the first line), but it looks like we started the process from the beginning. It does not sound correct because as you remember we save the progress in the configuration file.
We have such behavior because a pod is an unchanged object in its nature. So, when we update the pod, we don't perform an update but delete the current pod and create a new one. So, when we released the new version of our application, the old configuration file with the progress was deleted with the old pod.
Working with storages
Right now with our background process, we have an issue that the progress of work is not saved when our application is updated. So we need to find out the most appropriate way to save the progress. Due to we run it on one host, we can use hostPath volume for our purpose.
In simple words, hostPath mounts a file or a directory from the host filesystem to the pod. So that when we use this directory or file from our pod it is persisted on our host.
To add the support of a volume, we need to make changes to our app-pod.yml. Please review the new lines added.
apiVersion: v1
kind: Pod
metadata:
  name: app-pod
spec:
  containers:
  - name: hello-kube
    image: hello-kube:1.2
    volumeMounts:
    - mountPath: /configuration
      name: configuration-volume
  volumes:
  - name: configuration-volume
    hostPath:
      path: /run/desktop/mnt/host/hello-kube-vol
      type: DirectoryOrCreate
We start reviewing the changes in the file from the bottom. The new element spec.volumes describes which volumes can be used in the pod.
Our hostPath volume has the name configuration-volume with the path /run/desktop/mnt/host/hello-kube-vol.
After defining the volume, we need to mount this volume into the container. For that purpose, we use the element spec.containers.volumeMounts and as parameters, we specify the name of the volume (should match with the name in volumes.name) and the path within the container where the volume should be mounted. In this case, it's /configuration.
It is time to change our application code to store the configuration file in the folder /configuration.
Console.WriteLine("Hello, Kube! v.1.2");

const string configFileName = "/configuration/step.config";

// Others lines are unchanged
Don't forget to build a new container and deploy a new pod file.
Hello, Kube! v.1.2
Starting background process
Looking for a configuration in local file
Configuration does not exists. Starting from 0 step
Processing step: 0
Processing step: 1
Processing step: 2
As expected the application started with a 0 step.
I won't release the new version of the application to check if our configuration file is stored in a volume. For that purpose, I delete the pod and recreate it again.
kubectl delete pod app-pod
kubectl apply -f app-pod.yml
kubectl logs app-pod
The response that I have is the following
Hello, Kube! v.1.2
Starting background process
Looking for a configuration in local file
12 steps were completed. Continue process.
Processing step: 13
Our background process finally saves the progress. So, we can not be afraid to restart or recreate our pod.
Kubernetes has a big list of supported storages. I don't think you will need all of them for your applications, but checking which support is useful.
Summary
In this article, we explored using Kubernetes to host .NET 8 applications. We containerized a simple console application, introduced key Kubernetes components, and set up a local cluster using Docker Desktop. By deploying our application in a Kubernetes pod and addressing state persistence challenges with volumes, we gained practical insights into Kubernetes usage.
In the next article, we are going to learn how to deploy and scale applications.
Links
Image credits: Blue White Orange and Brown Container Van by Pixabay

